If you've ever dreamed of combining the rich, velvety creaminess of cheesecake with the iconic flavor and color of red velvet cake, I have just the thing for you. This Red Velvet Chocolate Cheesecake Recipe is a no-bake marvel that’s as stunning as it is delicious.

Jump to:
Why You'll Love This Recipe
Honestly, whenever I make this red velvet cheesecake, it’s the star of the night. It’s got that perfect balance of bold color, smooth texture, and just enough chocolate to satisfy any craving.
- Breathtaking Presentation: Its vibrant red hue and glossy chocolate really wow guests.
- No Baking Required: Easy prep means less stress and more time to enjoy.
- Rich, Creamy Texture: Silky smooth filling that melts in your mouth.
- Versatile Flavor Combo: The cocoa undertones blend beautifully with the classic cheesecake tang.
Ingredients & Why They Work
Before we dive in, a little heads up: quality ingredients really make a difference here. Softened cream cheese and chilled heavy cream are key to nailing that luxurious texture, and using proper red food coloring ensures the signature vibrant look. Here’s a quick peek behind why each ingredient is essential.

- Oreo cookies: These create a rich, chocolaty crust with just the right crunch and flavor.
- Unsalted butter: Melts and binds the crust crumbs into a firm base without extra saltiness.
- Gelatine powder: The magic ingredient that helps this no-bake cheesecake set up firm and sliceable.
- Water: Used to bloom the gelatine for perfect dissolution.
- Heavy/thickened cream: Whipped to soft peaks, it adds lightness and smoothness to the filling and topping.
- Cream cheese: The base of the filling — choose block form, softened but not melted, for best results.
- Caster sugar/superfine sugar: Dissolves easily for a smooth, sweet finish without graininess.
- Vanilla extract: Enhances the overall flavor with a warm, subtle sweetness.
- 70% chocolate (or dark chocolate): Adds that deep chocolate richness with slight bitterness to balance the sweetness.
- Red food colouring: The star of the show that gives the cheesecake its iconic red velvet color.
- Shaved or grated dark chocolate (optional): Perfect for garnishing and stabilizing the whipped cream topping, making it look as good as it tastes.
Make It Your Way
This Red Velvet Chocolate Cheesecake Recipe is wonderfully versatile, making it easy to tailor for different tastes and occasions. Don’t be afraid to experiment – whether you want to tone down the red color, try a different crust, or add a special twist to the topping, it’s all about making this stunning dessert your own.
- Oreo Crust Substitute: If you prefer a lighter base, swapping out the Oreo cookies for graham cracker crumbs creates a milder, buttery foundation. I tried this once when I wanted a less intense chocolate flavor, and the cheesecake still held its rich creaminess beautifully.
- Color Tweak: For a softer shade of red, reduce the red food coloring to 4 teaspoons instead of 6. I find this subtle tone just as festive, especially for daytime celebrations or spring events.
- Chocolate Variety: Using milk chocolate instead of 70% dark chocolate creates a sweeter filling. It’s a hit with kids or anyone with a sweet tooth. The rich cream cheese balances the sugar perfectly.
- Whipped Cream Stabilizer: Adding grated dark chocolate into the whipped cream topping not only lends a lovely texture but also helps prevent the cream from deflating. On busy party days, this little trick kept my topping fresh and appealing for hours.
- Dietary Swap: You can make this cheesecake gluten-free by choosing gluten-free Oreo-style cookies or alternative gluten-free biscuits. Just be sure your gelatine is also gluten-free.
Step-by-Step: How I Make Red Velvet Chocolate Cheesecake Recipe

Step 1: Prepare the Pan for Easy Cheesecake Removal
Start by flipping the base of your 20 cm (8 inch) springform pan upside down. This simple trick means you won’t have to deal with the pan lip when removing the cheesecake later. Lightly butter the pan base, then press a square piece of baking paper over it. Attach the pan sides back onto the base, allowing the excess paper to peek out over the edges. Finally, butter the inside of the pan sides and line them with more baking paper. This lining not only ensures a smooth finish but also makes lifting the cheesecake out a breeze — you can gently pull on the paper edges once set.
Step 2: Craft the Oreo Crust
Place 200 g of Oreo cookies into a food processor and blitz until they're fine crumbs. If you don’t have a processor, no worries — pop the cookies into a sealed plastic bag and crush them thoroughly with a rolling pin. Pour the crumbs into a bowl and mix well with 60 g of melted unsalted butter. You want a sandy texture that holds together when pressed. Press this mixture firmly and evenly into the pan base. Pop it into the fridge while you move on to the luscious cheesecake filling. Chilling the crust ensures it sets nicely and gives a satisfying crunch under the creamy layers.
Step 3: Bloom and Dissolve the Gelatine
Combine 2 teaspoons of unflavoured gelatine powder with 2 tablespoons of water in a small bowl. Let it sit for 5 minutes — the gelatine will soak up the water and puff up, becoming spongy. Next, warm it gently in a microwave or over a double boiler just until it dissolves fully. Watch carefully to avoid boiling, which can ruin the setting power. Set this smooth gelatine liquid aside to cool slightly; you’ll fold it into the cheesecake filling shortly.
Step 4: Whip the Cream to Soft Peaks
Pour 1 cup of chilled heavy cream into a mixing bowl and whip it using an electric mixer until soft peaks form — that means the cream holds shape but still looks billowy and light. Keep this whipped cream chilled in the fridge until you need it; cold cream folds more smoothly into the batter and helps create that velvety cheesecake texture.
Step 5: Melt the Dark Chocolate
Gently melt 150 g of 70% dark chocolate using a double boiler or microwave in short bursts. Be sure to stir frequently for an even, smooth consistency and to prevent burning. Once melted, let it cool just a little — it should still be liquid but not hot — before adding to the cream cheese mixture. This tempering step prevents the cheesecake filling from curdling.
Step 6: Beat the Cream Cheese and Sugar
In a large mixing bowl, beat 500 g of softened block cream cheese with ¾ cup caster sugar and 1 teaspoon vanilla extract until smooth and creamy. The trick here is to mix well so no lumps remain — this creates a wonderful, silky base for the rich cheesecake filling.
Step 7: Combine Chocolate, Gelatine, and Red Food Colouring
Slowly pour the melted chocolate into the cream cheese mixture, stirring continuously to keep the batter uniform. Next, add the dissolved gelatine liquid immediately and mix quickly — the gelatine starts to set as it cools, so you want it fully incorporated right away. Finally, stir in 6 teaspoons of red food colouring (especially important for UK readers!) until the entire batter boasts a vibrant, uniform red shade.
Step 8: Fold in the Whipped Cream
Gently fold the prepared whipped cream into the cheesecake batter. Use a spatula and a careful lifting motion to combine without deflating the air you created. This step is key to achieving the light, melt-in-your-mouth texture you want in a no-bake cheesecake.
Step 9: Assemble and Smooth the Cheesecake
Pour the cheesecake filling over the chilled Oreo crust in your springform pan. Use an offset spatula or the back of a spoon to smooth the surface evenly. This is your chance to make it look flawless before chilling, so take your time and get a nice flat top.
Step 10: Whip and Top with Cream
Whip 1 ¼ cups chilled heavy cream with 3 tablespoons caster sugar and 1 teaspoon vanilla extract until soft peaks form. For added stability and a hint of extra chocolate flavor, fold in 2 tablespoons shaved or grated dark chocolate. Spread or pipe this heavenly topping evenly over the cheesecake surface, creating a beautiful contrast to the rich red filling.
Step 11: Chill and Serve
Refrigerate the assembled cheesecake for at least 6 hours or overnight to allow it to set perfectly. When ready to serve, run a sharp knife around the springform edges to loosen, then carefully remove the sides. Slice with a hot, clean knife for neat pieces and garnish with extra shaved dark chocolate if you like. Serve chilled and get ready for compliments!
Top Tip
These tips can really elevate your Red Velvet Chocolate Cheesecake Recipe and ensure it turns out perfectly every time—smooth, velvety, and beautifully set.
- Blooming Gelatine Properly: I always let the gelatine powder fully absorb the water for a good 5 minutes before warming. This step helped me avoid any lumps and made sure the cheesecake sets just right without any wobbliness.
- Use Block Cream Cheese: Through trial and error, I found softened block cream cheese makes the batter silky smooth. Avoid cream cheese from tubs or that’s too warm—it can make the filling grainy.
- Chill Your Cream: Whipping cream straight from the fridge guarantees better volume and easier folding into the cheesecake. I keep my bowl and beaters cold, too, for extra fluffy results.
- Clean Slicing: Always dip your knife in hot water and wipe it dry before slicing. It gives you those clean, gorgeous cheesecake slices that impress every guest.
How to Serve Red Velvet Chocolate Cheesecake Recipe

Garnishes
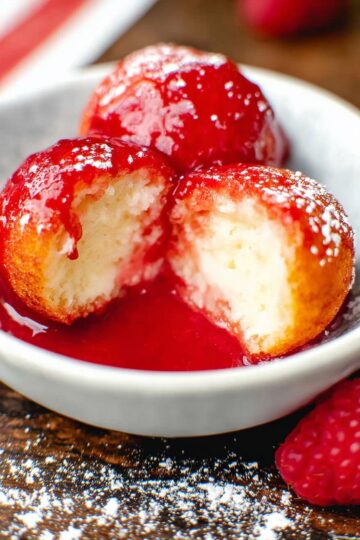
This cheesecake shines on its own, but for an extra flair, sprinkle with shaved or grated dark chocolate on top of the whipped cream. Fresh raspberries or a dusting of cocoa powder work beautifully too, adding a pop of color and balancing the richness.
Side Dishes
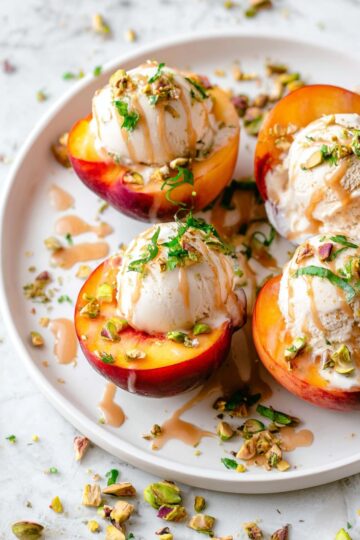
Serve your Red Velvet Chocolate Cheesecake Recipe alongside fresh berries or a light berry coulis. A scoop of vanilla bean ice cream or a dollop of crème fraîche also pairs wonderfully to balance the richness with some creaminess and freshness.
Make Ahead and Storage
Storing Leftovers
Store any leftover cheesecake covered tightly in the refrigerator. It will keep beautifully for up to 3 days while maintaining its texture and flavor. Just make sure it’s well covered to avoid it absorbing any fridge odors.
Freezing
This cheesecake freezes well if you want to make it ahead. Wrap it securely in plastic wrap, then foil, and freeze for up to 1 month. When ready, thaw overnight in the fridge before serving for the best texture.
Reheating
Since this is a no-bake cheesecake, it’s best served chilled and does not require reheating. Just slice and serve straight from the fridge for that perfect creamy melt-in-your-mouth experience.
Frequently Asked Questions:
Yes! If you prefer gelatin sheets, soak about 2 sheets in cold water until soft, then dissolve them gently like the powder before folding into the mixture. Adjust quantity based on packaging instructions to achieve a firm set.
The most common cause is under-dissolved gelatine or insufficient chilling time. Make sure the gelatine is completely melted and mixed evenly, and allow at least 6 hours chilling (preferably overnight) for a firm set.
Absolutely! If you prefer, graham cracker crumbs or crushed digestive biscuits mixed with melted butter work well as a base, though Oreos add a rich chocolate kick perfect for this cheesecake.
The red food coloring gives the cheesecake its signature striking red velvet look. You can use less for a softer hue or omit it, but it won’t have that classic red velvet appearance without it.
Final Thoughts
Making this Red Velvet Chocolate Cheesecake Recipe always feels like preparing a little celebration in a pan. It’s a showstopper dessert that’s deceptively easy with zero baking and yet so elegant. Whether it’s a special occasion or a sweet treat to impress your loved ones, this creamy, chocolatey, and vibrantly colored cheesecake will win hearts and smiles every time. Happy baking—and savor every luscious bite!
Print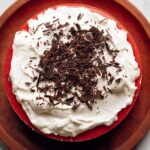
Red Velvet Chocolate Cheesecake Recipe
- Prep Time: 30 minutes
- Chilling Time: 6 hours
- Cook Time: 0 minutes
- Total Time: 6 hours 30 minutes
- Yield: 12 servings 1x
- Category: Dessert
- Method: No-Cook
- Cuisine: American
- Diet: Vegetarian
Description
This Red Velvet Cheesecake is a no-bake dessert that combines the bold, striking color and subtle cocoa flavor of red velvet cake with the creamy decadence of a rich, chocolatey cheesecake. Its velvety texture melts in your mouth, making it a perfect showstopper for special occasions and impressing guests.
Ingredients
Crust
- 200 g Oreo cookies (1.5 standard packs)
- 60 g unsalted butter, melted
Gelatine Mixture
- 2 tsp gelatine powder (unflavoured)
- 2 tbsp water
Cheesecake Filling
- 1 cup heavy/thickened cream, chilled
- 500 g cream cheese, softened (block form)
- ¾ cup caster sugar / superfine sugar
- 1 tsp vanilla extract
- 150 g 70% chocolate (or dark chocolate)
- 6 tsp red food colouring
Whipped Cream Topping
- 1 ¼ cups heavy/thickened cream, chilled
- 3 tbsp caster sugar / superfine sugar
- 1 tsp vanilla extract
- Optional: 2 tablespoon shaved or grated dark chocolate (for garnish)
Instructions
- Prepare the Pan: Flip the base of a 20 cm (8 inch) springform pan upside down for easier removal later. Lightly butter the pan base and press a square sheet of baking paper onto it. Clip the pan sides onto the base and let the excess paper stick out the sides. Butter and line the pan sides with baking paper.
- Make the Crust: Crush the Oreo cookies into fine crumbs using a food processor or by placing in a sealed bag and crushing with a rolling pin. Mix the crumbs thoroughly with the melted butter until fully combined. Press this mixture firmly into the base of the prepared pan to create an even crust layer. Chill in the fridge while preparing the filling.
- Bloom the Gelatine: Sprinkle the gelatine powder over the water in a small bowl and let it bloom for 5 minutes until it absorbs the water and becomes spongy. Then gently warm the gelatine in the microwave or over a double boiler until fully dissolved, being careful not to boil it. Set aside.
- Whip the Cream: Whip 1 cup of chilled heavy cream until it forms soft peaks. Set aside in the fridge to keep cold.
- Prepare the Chocolate Mixture: Melt the 70% dark chocolate gently using a double boiler or microwave in short bursts, stirring frequently until smooth. Set aside to cool slightly but not harden.
- Make the Cheesecake Batter: In a large bowl, beat the softened cream cheese with ¾ cup caster sugar and 1 teaspoon vanilla extract until smooth and creamy. Slowly add the melted chocolate, mixing well. Stir in the dissolved gelatine mixture immediately and quickly to incorporate fully. Add the red food colouring and mix until the color is uniform.
- Fold in the Whipped Cream: Gently fold the whipped cream into the cream cheese mixture until no streaks remain, maintaining a light and airy texture.
- Assemble the Cheesecake: Pour the cheesecake filling over the chilled Oreo crust in the springform pan and smooth the top with a spatula.
- Make the Whipped Cream Topping: Whip 1 ¼ cups chilled heavy cream with 3 tablespoon caster sugar and 1 teaspoon vanilla extract until soft peaks form. Optionally, mix in 2 tablespoon grated dark chocolate to stabilise. Spread or pipe the whipped cream evenly over the cheesecake surface.
- Chill the Cheesecake: Refrigerate the assembled cheesecake for at least 6 hours or overnight to allow it to set firmly.
- Serve: Run a knife around the edges to loosen, remove the springform sides carefully, then slice and garnish with extra shaved dark chocolate if desired. Serve chilled.
Notes
- This cheesecake is no-bake and relies on gelatine for firm setting, so ensure the gelatine is properly dissolved and mixed.
- Use block form cream cheese for the best texture; softened but not melted.
- Chilled heavy cream is key for whipping stability and smooth folding into the batter.
- Red food coloring can be adjusted depending on the desired shade; UK readers should use the specified teaspoons noted.
- The Oreo crust provides a rich chocolate base but can be substituted with graham cracker crumbs if preferred.
- For added stability, incorporate grated dark chocolate into the whipped cream topping to help prevent deflation.
- Use a sharp knife dipped in hot water for clean slicing.
- Store leftovers covered in the refrigerator for up to 3 days.
Nutrition
- Serving Size: 1 serving
- Calories: 540 kcal
- Sugar: 29 g
- Sodium: 210 mg
- Fat: 43 g
- Saturated Fat: 25 g
- Unsaturated Fat: 14 g
- Trans Fat: 0.2 g
- Carbohydrates: 37 g
- Fiber: 2 g
- Protein: 6 g
- Cholesterol: 103 mg

Leave a Reply