Craving something creamy, sweet, and perfectly portioned? This No-Bake Mini Cheesecakes Recipe has got you covered—easy to make, no oven required, and absolutely delicious with that classic cheesecake flavor in adorable little bites.

Jump to:
Why You'll Love This Recipe
I honestly can’t get enough of these mini no-bake cheesecakes. They’re the perfect little indulgence that feels fancy but takes barely any effort—great for when you want to impress without slaving away in the kitchen.
- Simple and quick: No oven means no hassle—just mix, chill, and enjoy.
- Perfect portions: Individual servings make party prep and cleanup a breeze.
- Versatile toppings: Dress them up with fresh fruit, chocolate, or your favorite compote.
- Creamy, dreamy texture: The combo of graham cracker crust and whipped cream cheese filling is irresistible.
Ingredients & Why They Work
Before you start assembling these mini cheesecakes, here’s a quick look at the ingredients and why they’re key. When shopping, grab full-fat dairy options for that perfect creaminess, and make sure your cream cheese and sour cream are at room temperature to avoid lumps.

- Graham cracker crumbs: Provides that classic buttery, slightly sweet crust base everyone loves.
- Brown sugar: Adds richness and a subtle molasses flavor, balancing the sweetness.
- Unsalted butter: Melts into the crumbs to bind everything into a firm crust.
- Heavy cream: Whipped to stiff peaks, it lightens the filling for that fluffy texture.
- Full-fat cream cheese: The star ingredient that brings that rich, tangy cheesecake flavor.
- Granulated sugar: Sweetens the filling cleanly without overpowering.
- Sour cream or plain yogurt: Adds tang and smoothness to keep the filling luscious.
- Fresh lemon juice: Brightens the flavors and cuts through the richness.
- Pure vanilla extract: Enhances the depth of flavor naturally.
- Optional toppings: Think fresh berries, chocolate shavings, or whipped cream for extra fun.
Make It Your Way
The beauty of this No-Bake Mini Cheesecakes Recipe is how versatile it is—feel free to get creative with flavors, toppings, and crust tweaks to make it truly your own delicious creation.
- Berry Bliss: Swirl in a spoonful of your favorite berry jam or fresh berry puree into the filling before folding in the whipped cream. I love how this adds a beautiful color and burst of fruity tang that's perfect for spring and summer gatherings.
- Chocolate Lover’s Dream: Add ¼ cup unsweetened cocoa powder to the cream cheese mixture for a rich chocolate cheesecake. Top with chocolate shavings or a drizzle of chocolate sauce. This version has become my go-to for holiday parties!
- Gluten-Free Crust: Swap graham cracker crumbs for gluten-free cookies or almond flour for a naturally gluten-free crust. I found almond flour adds a lovely nutty crunch that pairs wonderfully with the creamy filling.
- Citrus Zest: Mix in finely grated lemon or orange zest into the filling to brighten the flavor and give each bite a refreshing zing that pairs beautifully with the silky texture.
- Decadent Nutty Crust: Add finely chopped toasted pecans or walnuts to the graham cracker crust mixture before pressing it into the liners. It adds a delightful crunch and extra depth of flavor.
Step-by-Step: How I Make No-Bake Mini Cheesecakes Recipe

Step 1: Prep Your Pans and Gather Ingredients
Start by lining two standard 12-count muffin pans with cupcake liners. This recipe makes 24 mini cheesecakes, so two pans will fill up perfectly. Make sure your refrigerator has enough space to chill both pans later on—setting is key to these no-bake delights!
Step 2: Craft the Perfect Graham Cracker Crust
If your graham crackers aren’t already in crumb form, pop them into a food processor and pulse until fine crumbs form. In a medium bowl, stir together the graham cracker crumbs, brown sugar, and melted butter until the mixture resembles wet sand. This texture means you’re ready to press the crust into the liners. Use about 1 and ½ tablespoons per cupcake liner and firmly press down with the back of a spoon. This helps create a solid base that will hold up beautifully to the creamy filling.
Step 3: Optional Quick Bake for a Sturdier Crust
This step is optional but recommended if you prefer a firmer crust. Bake the crust-filled pans in a 350°F (177°C) oven for 5 minutes. When you pull them out, you'll appreciate the slight golden edges and sturdiness of the crusts. Let them cool for 10 minutes before filling; you don’t want to melt your filling on contact!
Step 4: Whip the Cream to Stiff Peaks
Grab your hand or stand mixer with a whisk attachment and whip the cold heavy cream on medium-high speed until stiff peaks form—this usually takes about 3 minutes. You’ll know it’s ready when the cream holds its shape and doesn’t drip when you lift the whisk. Set this aside for now; it’s what makes the filling light and fluffy.
Step 5: Create the Cream Cheese Filling
In a clean bowl, beat the softened cream cheese and granulated sugar together on medium speed until smooth and creamy—no lumps allowed! Scrape down the sides as you go, then add the sour cream, lemon juice, and vanilla extract. Beat on medium-high for about 1 minute until everything is silky and well combined. If you still see lumps, keep beating gently until it’s perfectly smooth.
Step 6: Fold in Whipped Cream Gently
Using a rubber spatula, slowly fold the whipped cream into the cream cheese mixture in several gentle turns. This step is crucial—folding preserves the air you whipped into the cream, keeping your cheesecakes light and airy rather than dense.
Step 7: Fill and Smooth the Mini Cheesecakes
Transfer the cheesecake filling onto the crusts. I love using a piping bag fitted with a large tip for a neat, even finish, but a spoon works just fine too. Pipe or spoon about 2 tablespoons of filling onto each crust, then use the back of a spoon to smooth the tops flat. This clean finish makes the cheesecakes extra pretty when it's time to serve.
Step 8: Chill and Set
Pop both pans into your refrigerator and chill for at least 3 hours to let the cheesecakes set perfectly. You can also refrigerate them for up to 2 days covered loosely with plastic wrap or foil. Trust me, waiting for the chilling time is absolutely worth it!
Step 9: Serve and Store
Before serving, add your favorite toppings like fresh fruit, chocolate sprinkles, or a dollop of whipped cream for an extra touch of indulgence. Keep your No-Bake Mini Cheesecakes refrigerated until ready to enjoy. Leftovers will keep fresh for up to 5 days when covered properly. Just remember they’ll soften if left out at room temperature for too long.
Top Tip
These No-Bake Mini Cheesecakes Recipe tips will help you get that perfectly creamy, light texture and keep your crusts just right every time. A few little tricks can make a big difference!
- Whip the Cream Properly: Make sure your heavy cream is cold before whipping. Achieving stiff peaks in about 3 minutes helps keep the filling light and airy.
- Room Temperature Ingredients: Let your cream cheese and sour cream come to room temperature before mixing to avoid lumps and ensure a smooth, creamy filling.
- Optional Crust Bake: If you like a sturdier crust that holds up nicely under your filling, a quick 5-minute bake at 350°F (177°C) makes all the difference.
- Handle the Filling Gently: When folding in the whipped cream, do it slowly with a spatula to keep the airy texture — that’s what makes the mini cheesecakes so light and dreamy.
How to Serve No-Bake Mini Cheesecakes Recipe

Garnishes
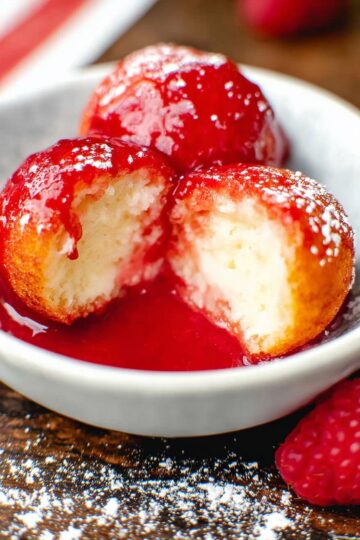
These mini cheesecakes are a perfect blank canvas for toppings! Fresh berries like raspberries, blueberries, or sliced strawberries add vibrant color and a refreshing burst. For a sweeter touch, drizzle fruit compote or a berry glaze over the top. Chocolate shavings or a dusting of cocoa powder bring a decadent edge, while a dollop of freshly whipped cream adds extra creaminess and flair.
Side Dishes
Serve your No-Bake Mini Cheesecakes Recipe alongside light and fruity sides to balance the richness. A crisp green salad with citrus vinaigrette or a fresh fruit salad are excellent choices for a party spread. For afternoon tea, pair these mini treats with a cup of aromatic coffee or herbal tea to round out your dessert experience.
Make Ahead and Storage
Storing Leftovers
After enjoying your mini cheesecakes, store any leftovers covered tightly in the refrigerator. They will keep beautifully for up to 5 days, maintaining their creamy texture and flavor. Just be sure to keep them chilled until you're ready to serve again.
Freezing
You can freeze these mini cheesecakes if you want to save them longer. Place them in a single layer on a tray to freeze initially, then transfer to an airtight container or freezer bag. They will keep well for up to 1 month. Thaw overnight in the refrigerator before serving for the best texture.
Reheating
Since this is a no-bake dessert, reheating isn’t necessary. Just let any refrigerated or thawed mini cheesecakes sit at room temperature for about 10-15 minutes before serving to soften slightly and enhance their creamy flavor.
Frequently Asked Questions:
Yes! Baking the crust is optional. Skipping the 5-minute bake at 350°F (177°C) means the crust will be a bit crumblier but still delicious. Baking just makes the crust sturdier and easier to handle.
Lumps usually happen when the cream cheese or sour cream isn’t fully softened to room temperature. To avoid this, make sure both ingredients are soft before mixing, and beat the filling long enough until it's smooth and creamy.
For the best results, refrigerate for at least 3 hours to allow the filling to set properly. You can chill them up to 2 days covered tightly before serving.
Absolutely! These mini cheesecakes are perfect make-ahead desserts. Prepare and refrigerate them up to 2 days before your event. Just add any fresh toppings right before serving for the best presentation.
Final Thoughts
Making these No-Bake Mini Cheesecakes Recipe feels like a little celebration in every bite. Whether you’re serving them at a gathering or treating yourself on a quiet night in, their creamy texture and buttery crust never fail to impress. With minimal effort and maximum taste, these charming little desserts prove that sometimes the simplest recipes are the most memorable. So go ahead, whip up a batch — your future self (and your guests!) will thank you.
Print
No-Bake Mini Cheesecakes Recipe
- Prep Time: 25 minutes
- Chilling Time: 3 hours
- Cook Time: 5 minutes
- Total Time: 3 hours 30 minutes
- Yield: 24 mini cheesecakes 1x
- Category: Dessert
- Method: No-Cook
- Cuisine: American
- Diet: Vegetarian
Description
These Mini No-Bake Cheesecakes are creamy, delicious, and easy to make. Featuring a buttery graham cracker crust and a smooth cream cheese filling whipped with heavy cream, they set perfectly in cupcake liners for individual servings. No oven required, with an optional quick bake for sturdier crusts. Ideal for parties, gatherings, or anytime you crave a classic cheesecake without the fuss of baking.
Ingredients
Crust
- 2 cups (240g) graham cracker crumbs (about 16 full sheet graham crackers)
- ⅓ cup (67g) packed light or dark brown sugar
- ½ cup (8 Tbsp; 113g) unsalted butter, melted
Filling
- 1 cup (240ml) cold heavy cream or heavy whipping cream
- 16 ounces (452g) full-fat brick cream cheese, softened to room temperature
- ⅓ cup (67g) granulated sugar
- 2 Tablespoons (30g) sour cream or plain yogurt, at room temperature
- 1 teaspoon fresh lemon juice
- ½ teaspoon pure vanilla extract
- optional: your desired toppings (e.g., fresh fruit, fruit compote, chocolate shavings, or whipped cream)
Instructions
- Prepare pans: Line two standard 12-count muffin pans with cupcake liners. Make sure you have enough refrigerator space for both pans later.
- Make crust: If your graham crackers aren’t in crumb form, pulse them in a food processor until fine. In a medium bowl, mix graham cracker crumbs, brown sugar, and melted butter until combined and resembles wet sand. Spoon about 1 and ½ tablespoons of crust mixture into each liner, pressing down firmly with the back of a spoon.
- Bake crust (optional): For sturdier crusts, bake pans at 350°F (177°C) for 5 minutes. Allow crusts to cool for 10 minutes before filling. If skipping baking, proceed directly to filling.
- Whip cream: Using a hand mixer or stand mixer with a whisk attachment, whip the cold heavy cream on medium-high speed until stiff peaks form, about 3 minutes. Set aside.
- Make filling: In a separate bowl, beat the cream cheese and granulated sugar on medium speed until smooth and creamy. Scrape down the bowl as needed. Add sour cream, lemon juice, and vanilla extract, then beat on medium-high speed for about 1 minute until smooth and lump-free.
- Combine filling and cream: Fold the whipped cream gently into the cream cheese mixture using a rubber spatula, mixing slowly to retain air and achieve a light texture.
- Fill crusts: Spoon or pipe about 2 tablespoons of filling onto each crust. Smooth tops with the back of a spoon for a flat finish.
- Refrigerate: Chill the cheesecakes in the pans for at least 3 hours or up to 2 days. Cover loosely with plastic wrap or foil if refrigerating longer than 3 hours.
- Serve and store: Keep refrigerated until serving. Add optional toppings if desired. Leftovers store covered in the refrigerator for up to 5 days.
Notes
- Baking the crust is optional but makes the crust sturdier and less crumbly.
- Using full-fat cream cheese and heavy cream yields the best creamy texture.
- Room temperature cream cheese and sour cream blend better to avoid lumps.
- Piping the filling into crusts results in a neater presentation.
- Allow cheesecakes to chill thoroughly for proper setting.
- Use cupcake liners with a sturdier rim to prevent tearing when removing.
- Top with fresh berries, fruit compote, chocolate shavings, or whipped cream for variety.
Nutrition
- Serving Size: 1 mini cheesecake
- Calories: 200 kcal
- Sugar: 12 g
- Sodium: 110 mg
- Fat: 15 g
- Saturated Fat: 9 g
- Unsaturated Fat: 5 g
- Trans Fat: 0 g
- Carbohydrates: 15 g
- Fiber: 1 g
- Protein: 3 g
- Cholesterol: 50 mg

Leave a Reply