If you love a rich, crunchy treat packed with peanut buttery goodness, you’re in for a real treat with this Creamy Butterfinger Balls with Chocolate Coating Recipe. It’s an easy no-bake dessert that’s perfect for sharing—or sneaking a few when no one’s looking!

Jump to:
- Why You'll Love This Recipe
- Ingredients & Why They Work
- Make It Your Way
- Step-by-Step: How I Make Creamy Butterfinger Balls with Chocolate Coating Recipe
- Top Tip
- How to Serve Creamy Butterfinger Balls with Chocolate Coating Recipe
- Make Ahead and Storage
- Frequently Asked Questions:
- Final Thoughts
- Creamy Butterfinger Balls with Chocolate Coating Recipe
Why You'll Love This Recipe
I can’t get enough of these Butterfinger Balls—they come together so quickly and offer such a wonderful mix of creamy, crunchy, and chocolatey flavors. They’ve become my go-to for last-minute get-togethers and festive celebrations!
- Super Simple: No oven needed—just mix, chill, dip, and you’re done.
- Perfect Texture: Creamy peanut butter meets crispy Butterfinger chunks and graham cracker crumbs.
- Customizable Coating: Full or half chocolate dip, plus toppings to match any vibe.
- Great Make-Ahead: Freeze them for easy storage and enjoy anytime.
Ingredients & Why They Work
Getting the right ingredients really makes all the difference in this recipe. Stick with regular creamy peanut butter—no natural brands that separate! And make sure your Butterfingers are nicely crushed to get that signature crunch in every bite.

- Butter: Softened for perfect creaminess when blended with peanut butter.
- Vanilla extract: Adds a subtle warmth and depth to the flavor.
- Peanut butter: Use classic creamy versions like Jif or Skippy for smooth texture.
- Powdered sugar: Sweetens and helps firm up the dough.
- Graham cracker crumbs: Adds a gentle crunch and balances out the richness.
- Crushed Butterfinger bars: The star ingredient, giving these bites their trademark crunch.
- Chocolate bark or chips: For that shiny, luscious coating that seals the deal.
- Optional toppings: Extra crushed Butterfingers, festive sprinkles, or coarse sea salt to personalize your treats.
Make It Your Way
One of the great joys of making Creamy Butterfinger Balls with Chocolate Coating Recipe is how easy it is to customize them to suit your tastes or the occasion. Whether you prefer a twist on texture, flavor, or presentation, there’s room to get creative!
- Variation: I love adding a sprinkle of coarse sea salt right after dipping the balls in chocolate. It gives a beautiful balance to the sweet and adds a little extra crunch, making each bite even more addictive.
- Chocolate Choices: For a richer flavor, try using dark chocolate bark or chips instead of milk chocolate. It contrasts beautifully with the peanut butter and Butterfinger sweetness.
- Half-Dipped Style: If you want to make these look extra special, try dipping only halfway into the chocolate for a fun two-tone effect. You can even drizzle some extra melted chocolate over the top once they’ve set for a decorative finish.
- Holiday Flair: Adding festive sprinkles before the chocolate hardens makes these treats perfect for Christmas, Halloween, or any celebration. Plus, they freeze wonderfully, so you can prepare them ahead for parties or gift-giving.
- Diet-Friendly Adaptations: While traditional peanut butter works best for texture, you can experiment with allergy-friendly spreads if needed—just keep an eye on consistency for rolling.
Step-by-Step: How I Make Creamy Butterfinger Balls with Chocolate Coating Recipe

Step 1: Cream the Peanut Butter and Butter
Start by combining your softened butter and peanut butter in a large mixing bowl. I usually use a hand mixer or stand mixer on medium speed, beating until the mixture is completely smooth and fluffy. This usually takes about 2 to 3 minutes. Add in the vanilla extract and give it just another quick mix to blend it evenly—this little splash really lifts the flavors beautifully.
Step 2: Fold in the Powdered Sugar and Crunchy Ingredients
Next, gradually add the powdered sugar to your creamy base. Keep your mixer on low this time to avoid a dust storm! Scrape down the sides of the bowl with a spatula as you go to make sure everything gets incorporated. Once the powdered sugar is fully mixed in, gently fold in the graham cracker crumbs and the crushed Butterfinger bars with a spatula. You want even distribution but also to keep that lovely crunch intact.
Step 3: Shape the Balls
Line a baking sheet with parchment paper for easy cleanup. Then, using a small cookie scoop or spoon, portion out about 1 to 1½ tablespoons of the mixture. Roll each portion between your palms to form smooth balls. Place them spaced apart on your lined sheet. This part is surprisingly fun—it feels a bit like crafting little peanut butter treasures!
Step 4: Freeze Until Firm
Pop your tray of formed balls into the freezer for 30 minutes. This chilling step is key to making sure they hold their shape and get nice and firm before dipping. Plus, it makes dipping much easier and less messy.
Step 5: Melt the Chocolate Coating
While your balls are chilling, melt the chocolate bark or chips. Use a microwave-safe bowl and heat the chocolate in 30-second bursts at 50% power. Stir well between each burst so it melts evenly without burning. You’re aiming for a smooth, glossy texture that's perfect for coating.
Step 6: Dip, Decorate, and Set
Once the balls are firm, dip them into the melted chocolate—either fully or halfway depending on your preference. Immediately top with any extras like extra crushed Butterfinger pieces, festive sprinkles, or a pinch of sea salt before the chocolate hardens. Place them back on the parchment-lined sheet to let the coating set completely. This usually takes a little while at room temperature, but you can speed it up by placing them back in the fridge.
Top Tip
These tips will help you get the best texture, flavor, and presentation when making your Creamy Butterfinger Balls with Chocolate Coating Recipe—so every bite is perfect!
- Choose the Right Peanut Butter: I found that using regular creamy peanut butter like Jif or Skippy gives a smooth, consistent base that holds together well—avoid natural types that separate for best results.
- Freeze Before Dipping: Freezing the balls for at least 30 minutes ensures they’re firm, which makes dipping in chocolate easier and helps the coating set up beautifully without melting the centers.
- Gentle Chocolate Melting: Melting chocolate at half power in short bursts while stirring prevents overheating and seizing, giving you that silky smooth coating every time.
- Don’t Overmix Dry Ingredients: Folding in graham cracker crumbs and crushed Butterfinger bars gently keeps the texture just right—too much mixing can turn the balls crumbly or dense.
How to Serve Creamy Butterfinger Balls with Chocolate Coating Recipe

Garnishes
Add an extra special touch by garnishing your Butterfinger Balls with a sprinkle of crushed Butterfinger pieces for crunch, a pinch of coarse sea salt to balance sweetness, or festive sprinkles to make them holiday-ready and colorful.
Side Dishes
Serve these buttery, chocolatey delights alongside a scoop of vanilla ice cream, a cup of rich hot chocolate, or even fresh berries for a refreshing contrast. They also pair wonderfully with coffee or milk for an indulgent snack time treat.
Make Ahead and Storage
Storing Leftovers
Store your Creamy Butterfinger Balls in an airtight container in the refrigerator—this keeps them fresh and maintains the chocolate coating’s snap. They will stay delicious for up to 1 week.
Freezing
These treats freeze wonderfully! Place the balls in a single layer on a baking sheet to freeze individually, then transfer to a sealed container or freezer bag. They keep well for up to 3 months—perfect for planning ahead or holiday gifting.
Reheating
No reheating needed! If frozen, simply transfer Butterfinger Balls to the fridge overnight to thaw. Serve chilled or bring to room temperature for the best creamy, crunchy experience.
Frequently Asked Questions:
While you could try crunchy peanut butter, creamy peanut butter works best for this recipe because it blends smoothly and helps the balls hold their shape without being too crumbly.
Milk chocolate chips or chocolate bark are perfect for a smooth, sweet coating. If you prefer a richer taste, dark chocolate chips also work wonderfully.
Make sure you freeze the balls until firm before dipping them in melted chocolate. Also, melt your chocolate gently at 50% power in the microwave and dip quickly.
Absolutely! They freeze well for up to 3 months and can be thawed in the fridge before serving, making them an ideal make-ahead treat for any occasion.
Final Thoughts
There’s something incredibly satisfying about dipping rich, crunchy Butterfinger Balls into silky chocolate and knowing you whipped them up with just a few pantry staples. This Creamy Butterfinger Balls with Chocolate Coating Recipe is not only a crowd-pleaser but also fuss-free, making it a must-have in your no-bake dessert repertoire. Whether it’s a holiday gathering, a gift, or just a sweet treat for yourself, these balls bring comfort and joy in every bite. Happy indulging!
Print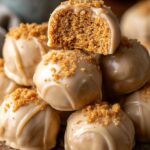
Creamy Butterfinger Balls with Chocolate Coating Recipe
- Prep Time: 20 minutes
- Freezing Time: 30 minutes
- Cook Time: 0 minutes
- Total Time: 50 minutes
- Yield: 24 balls 1x
- Category: Dessert
- Method: No-Cook
- Cuisine: American
- Diet: Vegetarian
Description
Butterfinger Balls are a quick and easy no-bake treat combining creamy peanut butter, graham crackers, and crushed Butterfinger bars, coated in rich melted chocolate for a deliciously crunchy and sweet bite-sized dessert.
Ingredients
Base Ingredients
- 4 tablespoons butter softened
- 1 teaspoon vanilla extract
- 1 cup peanut butter (avoid all-natural varieties that separate)
- 1 cup powdered sugar
- ¾ cup graham cracker crumbs
- ½ cup crushed Butterfinger bars
Coating and Decoration
- 8 ounces chocolate bark or chocolate chips for coating
- Optional: extra crushed Butterfinger bars
- Optional: festive sprinkles
- Optional: coarse sea salt for topping
Instructions
- Mix the Base: In a large bowl, use a hand or stand mixer to cream together the peanut butter and softened butter until smooth. Add vanilla extract and mix until combined.
- Add Sweetness and Crunch: Gradually mix in the powdered sugar at low speed, scraping the sides of the bowl as needed. Fold in graham cracker crumbs and crushed Butterfingers until the mixture is evenly combined.
- Form the Balls: Line a baking sheet with parchment paper. Scoop about 1 to 1½ tablespoons of the dough and roll into balls. Place them spaced apart on the sheet.
- Chill to Set: Freeze the formed balls for 30 minutes or until completely firm.
- Melt the Chocolate: In a microwave-safe bowl, melt the chocolate bark or chips in 30-second intervals at 50% power, stirring between bursts until smooth. Be careful not to overheat.
- Dip and Decorate: Dip each chilled ball in the melted chocolate—either fully or halfway. Immediately top with additional crushed Butterfingers, sea salt, or sprinkles before the chocolate sets.
- Let Them Set: Allow the chocolate coating to harden completely before serving or storing.
Notes
- Use regular peanut butter (like Jif or Skippy) for best consistency.
- For a deeper chocolate flavor, use dark chocolate chips or bark.
- These freeze beautifully—great for make-ahead treats during holidays or special occasions.
- Try dipping only halfway for a two-tone look or drizzle extra chocolate over the tops once set.
Nutrition
- Serving Size: 1 ball
- Calories: 130 kcal
- Sugar: 10 g
- Sodium: 70 mg
- Fat: 8 g
- Saturated Fat: 3 g
- Unsaturated Fat: 4 g
- Trans Fat: 0 g
- Carbohydrates: 12 g
- Fiber: 1 g
- Protein: 3 g
- Cholesterol: 10 mg

Leave a Reply